If you’ve had the chance to spend a day out on the track, we suspect that towards the end of the day you were starting to smell a fragrance that was new to you: the odor of hot
brakes. You may also have noticed that you were having to push harder on the brake pedal and your car was taking longer to slow down. And then there was the fine dirty dust that was coating those slick new wheels.
What you were learning was that
brake pads intended for street use just don’t cut it for a hard day of track use. So if you’re thinking seriously about going back out on the track, and are already thinking about how you could go faster on some of the corners, it’s time to switch to performance brake pads and to consider upgrading your
brake rotors.
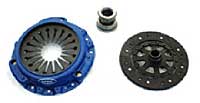
Upgraded Brake PadsSwitching brake pads is not an expensive or technically difficult chore. If you’re thinking about going faster, then you’ll want to be able to stop more quickly, and that means new brake pads.
Disc brakes seem like simple devices. When the brake pedal is pressed, a “
master cylinder” behind the pedal forces brake fluid through the brake lines to the “slave cylinders” on each wheel. The
slave cylinders in turn push against the backs of brake pads in the brake calipers on each wheel and these pads push against both sides of the brake discs (discs also are often referred to as “rotors”).
Since the brake rotors are connected directly to the wheels, the friction created by the pressure of the pads against the rotors slows down the wheel, causing the car to slow down. The rubbing of the brake pads against the rotors generates heat as a byproduct of the process.
How well the brakes work, especially over a long period when they are being used frequently—such as descending a long hill on curving roads or when speed changes from very fast to very slow take place frequently, such as in racing—depends on two factors. The first is the co-efficient of friction between the material in the disc and the material in the pad. The second is the ability of the pad to maintain that friction as the heat generated by the friction causes the rotor to heat up.
Both of these factors are determined by the material with which the brake pad is made. Brake pads are made of a variety of different materials, including organic, metallic, and ceramic materials, each with its own co-efficient of friction and ability to function effectively at varying temperatures.
On the street, you don’t use your brakes very hard or very frequently. As a result, brake pads designed for street use are typically made of materials that are softer and have lower co-efficients of friction so that they will slow the car down gradually and progressively, rather than an abrupt or grabby manner.
However, when you’re driving in a spirited manner at a track day or on the autocross course, you don’t want to slow down gradually. If you’re going to get good lap times on the autocross course, or be able to really drive at higher speeds on the track, you want the car to slow down in as short a distance as possible, something that the standard street pads aren’t really designed to do.
Also, if you put to the brakes to hard, continuous use—on a long section of curving roads, on an autocross course, or most definitely at a track day—the softer material on the street pads will become less effective in slowing the car down. As heat builds up in the disc from continuous use, the co-efficient of friction between the pad and the rotor decreases. In practical terms, that means you have to exert more and more pressure on the pedal to get the car to slow down, and stopping distances become longer and longer.
The easiest way to correct this is to substitute brake pads that have a higher co-efficient of friction and can stand up to heat for longer period of time. To meet these objectives, there are a wide range of alternative pads that you might buy. You can buy pads that are designed specifically for high-performance racing, and several gradations below that level.
Here, you don’t want to go overboard. A set of pads that would be perfect for a driver at the national championships is not what you want to put on your car for the occasional track day. That additional bite that will slow a race car down quickly from high speeds would throw your maiden aunt into her seat belts, something she probably wouldn’t appreciate.
In addition, racing brake pads that function very effectively at high temperatures don’t work well when they are cold. These types of pads are excellent for racing conditions where they can be heated up before being used hard, but are totally unsafe for daily driving where brakes are used more infrequently and are almost never heated to any degree.
The good thing is that there pads available for all levels of use. if you do anticipate the occasional high-spirited outing, but normally use the car for more typical purposes, you can easily find an all-around brake pad that will perform better on the track or autocross course, give you better responsiveness on the road, but will still be safe and comfortable for daily use.
You want one that will give a better “bite” than stock street pads and handle higher temperatures, but not be a full-on race pad. When selecting the pad, look at three factors: co-efficient of friction or “bite,” ability to function at high temperatures, and price.
One example of a good compromise is the “Greenstuff” brake pad set made by EBC, which produces adequate stopping power at lower temperatures than stock pads, thus reducing heat build-up, and will function effectively up to 800 degrees F. A side-benefit of these slightly harder pads is that they’ll generate less brake dust under normal or extended usage, so that your wheels don’t have to be cleaned as often. A set of these for the MINI will cost around $90 for the front pair and $80 for the rear pair.
Drilled and Slotted RotorsHeat that causes deterioration of the brakes is not just a factor of the brake pads; it is also generated by the brake rotors, or
brake discs, against which the brake pads rub. Build-up of brake pad residue on the rotors is a second source of deterioration of brake performance during a series of sessions during a track day.
Excellent replacement brake rotors are available that do a much better job of solving all of these problems than the original brake rotors with which the car comes equipped. Two different styles are good examples of the alternatives available to you, at two different price levels.
At the basic cost level, you can improve your brakes by substituting drilled and
slotted single-disc rotors for the stock rotors on your MINI. Drilled brake rotors are permitted in BMWCCA spec class racing. These rotors are drilled through their surface at a number of points across the area where the pads rub against the rotor, and also have slots machined into them that extend diagonally across the disc from the inside to the outside.
Drilling the
rotors has a major advantage in giving heat a place to dissipate, thus reducing the amount of heat build-up in spirited driving. Drilling as the secondary advantage of reducing the weight of the rotors, thus reducing the unsprung weight that has to be spun up and moved around when the car is in motion.
The
grooves also help dissipate the heat from the rotors by creating a draft effect across the surface of the disc. In addition, they provide a channel through which the dust generated as the brake pads rub against the rotors can be removed from underneath the pads. By keeping the pads clean, the grooves increase the frictional efficiency of the brakes.
The increased efficiency and reduction in heat build-up can make a big difference in maintaining your brake performance throughout an entire track day, and they help make sure that the brakes are as good on your last run of the day as on the first. In addition, they are inexpensive insurance to keep your brakes operating efficiently on the road over a long day of enthusiastic back-roads touring as well as on steep hill descents.
A good quality pair of drilled and slotted front rotors is available from catalog suppliers for about $180, and the slightly smaller rotors that fit the rear brakes is available for about $150. Installation of these rotors is a bolt-on, bolt-off affair.
If you’re a little more serious about improving your brake performance, but don’t want to replace your entire brake system to get more brake surface area, there is a slightly pricier option. You might wish instead to consider a high-quality pair of double-surface cross-drilled brake rotors, such as those manufactured by Brembo Brakes.
In addition to having the advantages of weight reduction, heat reduction, and pad cleaning offered by other cross-drilled brakes, the Brembo rotors are constructed in a different way than standard single-plate rotors.
Like the brake rotors on all professional race cars in NASCAR, ALMS, and Formula 1, these rotors are constructed of two layers of metal. The two metal plates of the rotors are joined by braces in between the surfaces that create openings along the edge of the rotor.
The openings created by the cross-drilling, and the openings on the edges of the rotor work together to help ventilate and cool the brake rotors. In addition, this construction strengthens the rigidity of the rotor, reducing the chance that the rotor will become distorted under heavy use.
These
Brembo rotors have an attractive gold anti-corrosion finish that helps eliminate surface rust that can interfere with brake performance. The gold rotors also enhance the look of any road wheels, and give the MINI a more aggressive look. They are available for about $320 for the front brakes and about 4220 for the rear brakes. They are quite simple to install in a bolt-off, bolt-on operation and fit all standard MINI wheels.